In Part 1, I restored the hardware. In Part 2, I added Bluetooth control and gave it a voice. Now it's time for the real magic: giving this 40-year-old robot eyes and a brain.
The goal was simple but ambitious. Could I make the Omnibot autonomous? Could it see its environment, understand what's around it, and decide what to do on its own? The answer is yes, and the results are ready for Maker Faire Miami 2026.
The Vision: Retro Meets Modern AI
The Tomy Omnibot was a marvel of 1980s consumer robotics. It could be programmed via cassette tapes to deliver drinks and perform simple tasks. Four decades later, I've given it a brain transplant: a Raspberry Pi 5 with an AI-accelerated camera and cloud LLM integration.
The result is a robot that can see, think, and act autonomously while maintaining its vintage charm.
The AI Stack
The system has three layers working together:
- Perception Layer: The IMX500 AI Camera runs hardware-accelerated YOLOv8 object detection at 30 FPS
- Reasoning Layer: A cloud-based Groq LLM (Llama 3.1 8B) decides what to do with what it sees
- Action Layer: Audio tones control movement, text-to-speech provides a voice, and an animated eye display shows emotion
Layer 1: The Eyes (IMX500 AI Camera)
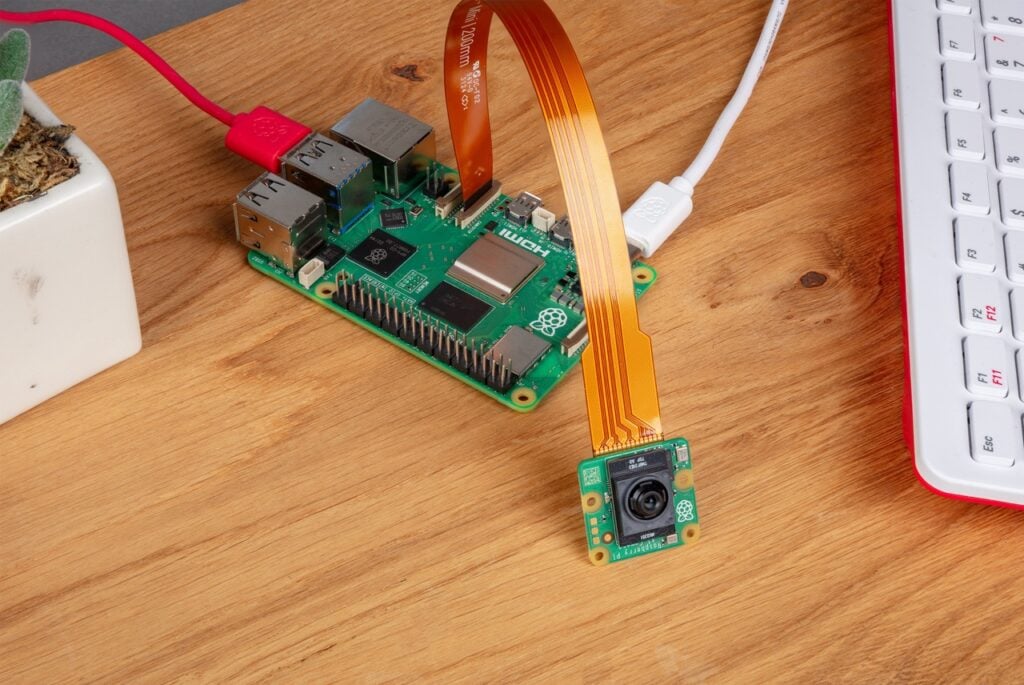
The magic starts with the Raspberry Pi AI Camera. This isn't a regular camera that sends frames to the CPU for processing. The IMX500 sensor has a built-in neural network accelerator. The AI inference happens on the camera chip itself.
When the system starts, YOLOv8 neural network weights are uploaded directly to the camera. Every frame is processed by on-chip AI, not the Pi's CPU. Detection results arrive as metadata alongside the image data.
The performance is impressive:
- Inference time: ~17ms per frame
- Frame rate: 30 FPS continuous
- Object classes: 80 (COCO dataset)
- Can detect people, animals, vehicles, household items, and more
Layer 2: The Brain (Cloud LLM)
Raw detections aren't useful on their own. The robot needs to understand what to do with what it sees. This is where the Large Language Model comes in.
The LLM acts as a "mission controller" receiving:
- The current task (like "Find and approach people")
- What objects are visible and where they are in the frame
- Recent actions taken
And it outputs movement commands (forward, backward, left, right), speech commands, and pattern commands (dance, circle, search). I'm using Groq's cloud API with Llama 3.1 8B because it returns responses in about 100ms. Running inference locally on the Pi takes 2-5 seconds, which is too slow for real-time autonomy.
Layer 3: The Body (Action System)
The beautiful part is that we're still using the Omnibot's original control system. Audio tones through the Bluetooth cassette adapter make it move:
- Forward: 1614 Hz
- Backward: 2013 Hz
- Left: 2208 Hz (3 seconds for 90°)
- Right: 1811 Hz (3 seconds for 90°)
I also added a 1.8" TFT display showing an animated "eye" that reacts to what the robot sees. When it detects a person, the eye looks happy. When it's turning, the eye looks in that direction. After 30 seconds of idle, it gets sleepy. This gives the robot personality and makes interactions feel more natural.
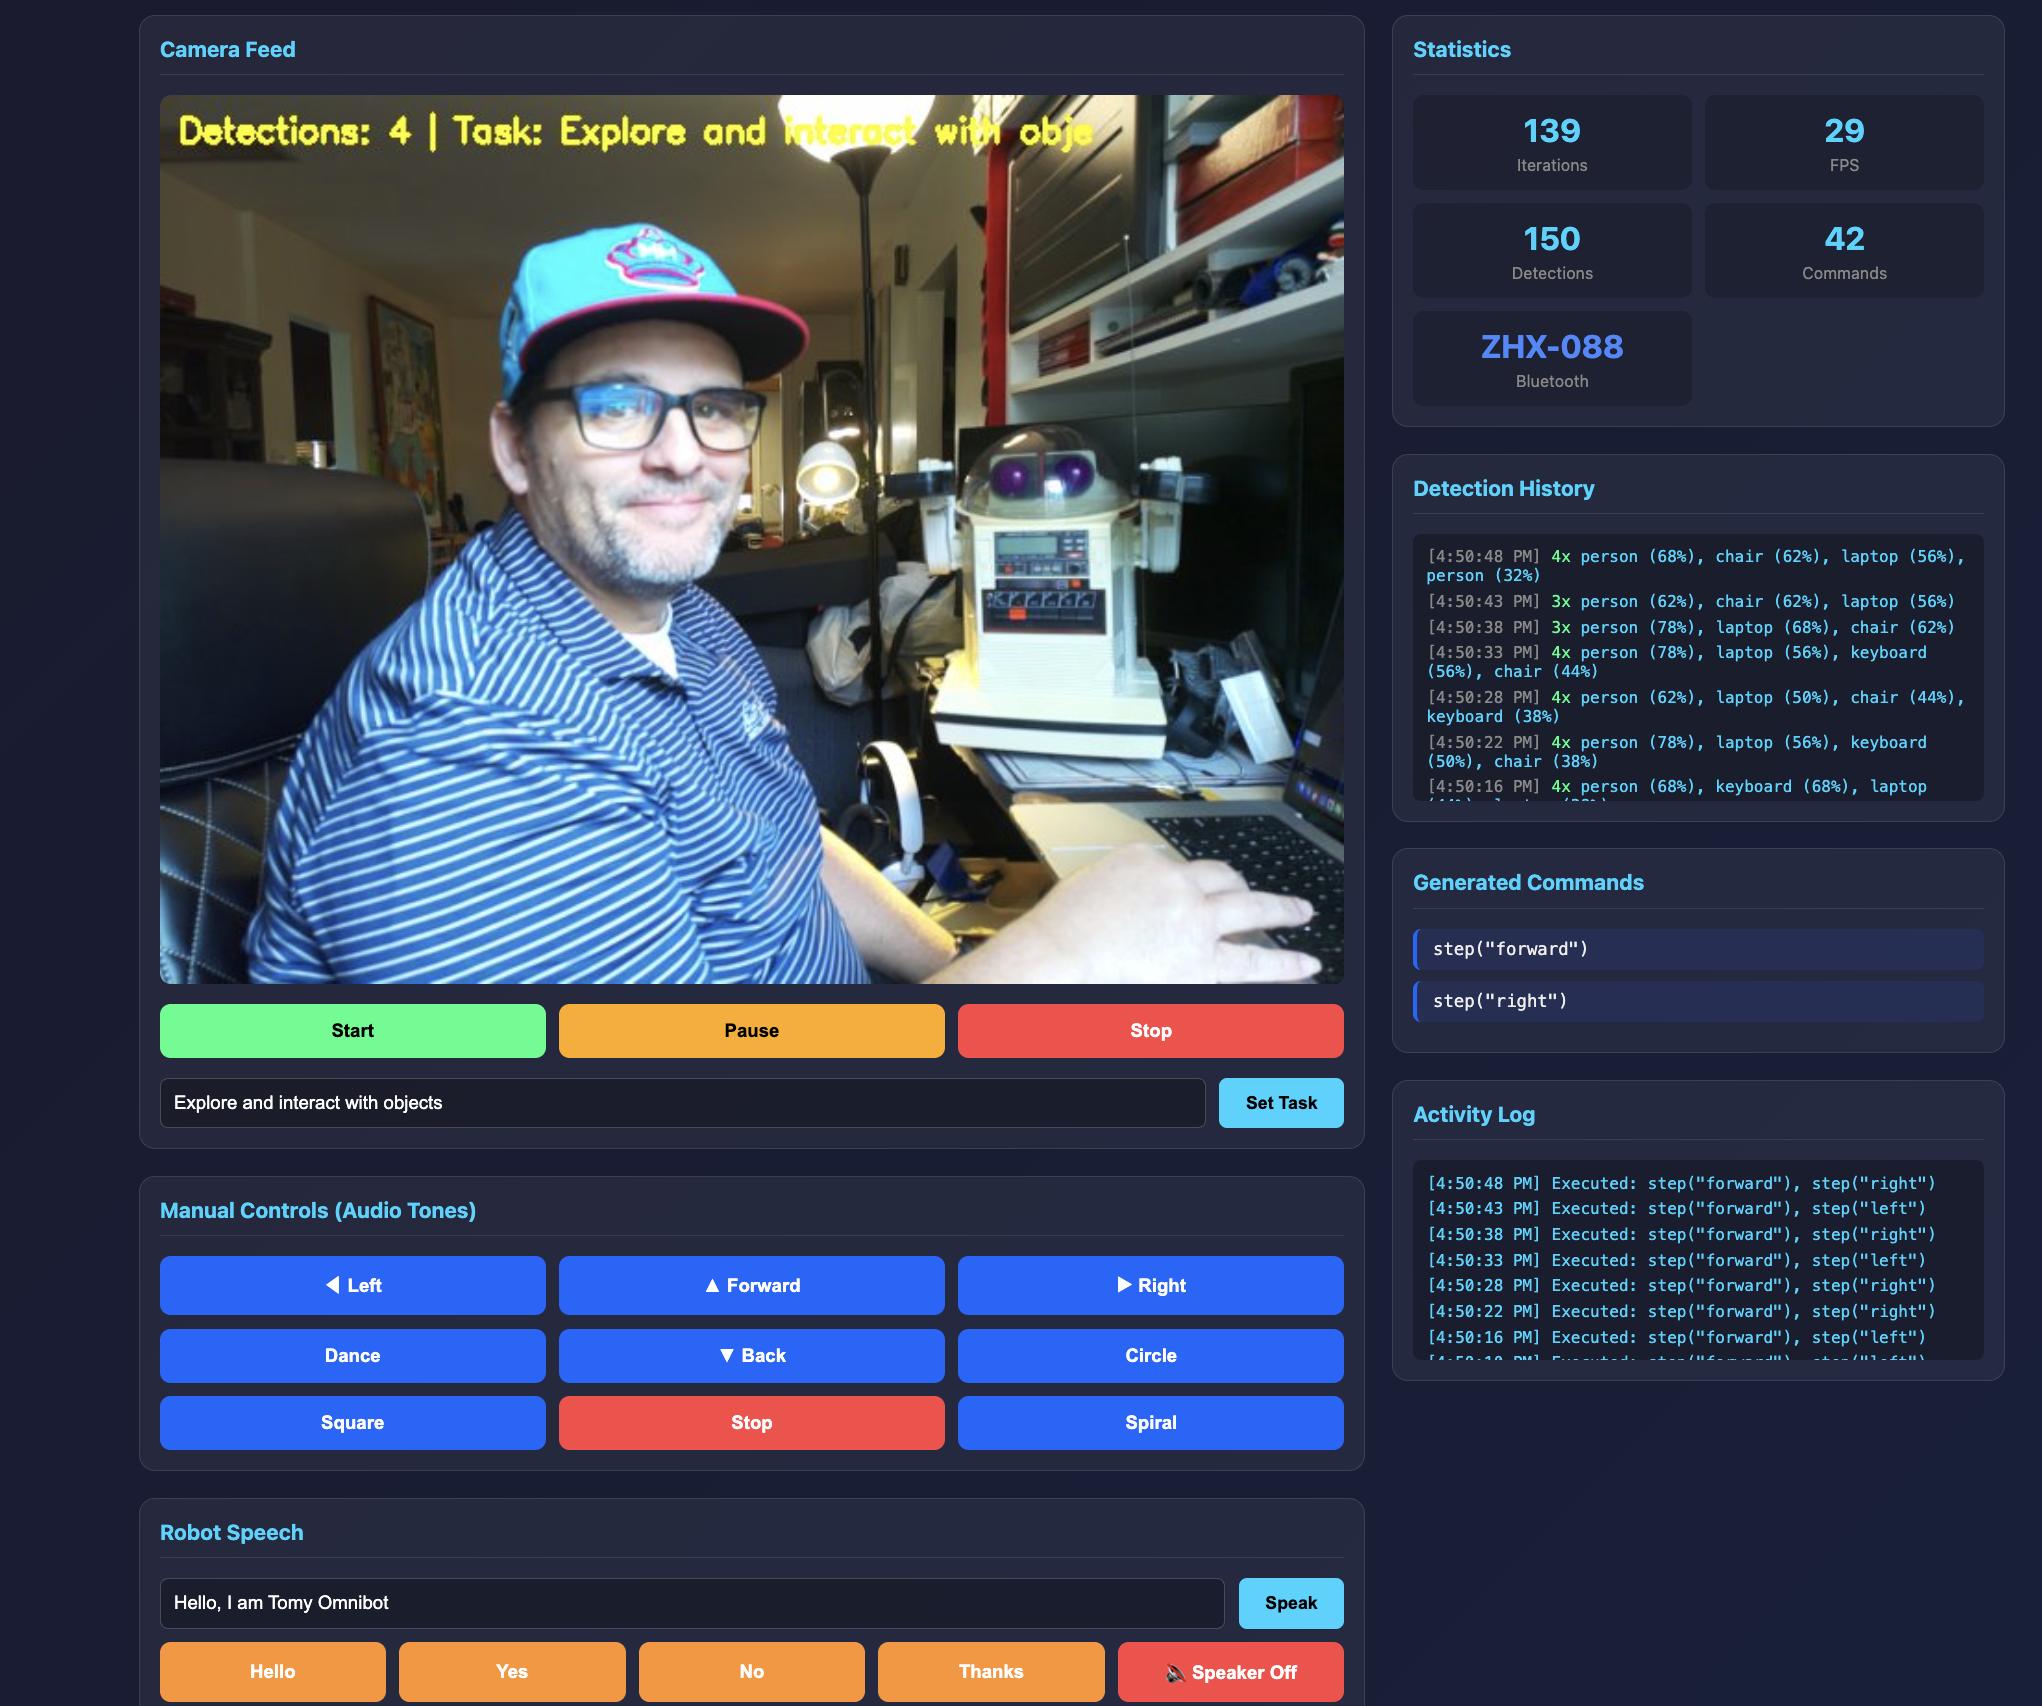
The Web Dashboard
Everything is controlled through a web dashboard built with Flask and WebSockets. The interface shows:
- Live camera feed with object detection overlays
- Statistics showing iterations, FPS, detections, and commands sent
- Detection history logging what the camera sees over time
- Generated commands showing what the LLM decides to do
- Activity log of executed actions
- Manual controls for overriding autonomous behavior
- Speech controls for making the robot talk
You can set different tasks like "Explore and interact with objects" or "Find and greet people" and watch the robot figure out what to do.
How It Works in Practice
When running autonomously, the system operates in a continuous loop every 500ms:
- Capture: Camera captures frame and runs YOLOv8 on-chip
- Reason: LLM receives detections and current mission, outputs commands
- Act: Robot executes commands via audio tones, eye display shows reaction
- Repeat: About 2 decisions per second with the full AI pipeline
For example, if the task is "Find and approach people":
- Camera detects a person on the right side of the frame
- LLM reasons: "Person is on the right. Turn right to center them."
- Robot turns right
- Next frame: person is now centered
- LLM reasons: "Person is centered. Move forward to approach."
- Robot moves forward and says "Hello!"
Why This Architecture Works
A few design decisions made this practical:
Hardware acceleration where it matters. The IMX500's on-chip inference means the Pi's CPU is free for other tasks. Vision doesn't bottleneck the system.
Cloud LLM for complex reasoning. Running a 7B parameter model locally takes 2-5 seconds per inference. Groq's cloud API returns in ~100ms. This makes real-time autonomous operation practical.
Simple, robust action layer. Audio tones are deterministic and reliable. No motors to calibrate, no encoders to read. If the frequency is right, the robot moves.
Graceful degradation. No internet? Falls back to local Ollama. Display not connected? System runs without it. Camera fails? Manual control still works via web dashboard.
Ready for Maker Faire
The system is now ready for demos at Maker Faire Miami 2026. Kids can interact with the Omnibot using simple button presses or by just walking up to it. The robot will see them, turn to face them, and say hello. They can give it tasks like "find my water bottle" and watch it search the room.
What makes this special is the contrast. A robot from 1984 with an 80s aesthetic, running 2026 AI technology. Hardware-accelerated neural networks. Cloud LLMs making decisions. All hidden behind that nostalgic plastic shell.
The Code
The entire AI system is open source on GitHub: github.com/MarioCruz/omnibotAi
The repo includes the Flask web dashboard, the YOLOv8 camera integration, Groq LLM client, the tone-based movement controller, and the animated eye display system. If you have a Raspberry Pi 5 with an AI Camera and an Omnibot (or any robot that responds to audio tones), you can try this yourself.
What's Next: Physical Integration (Part 4)
The AI brain is working. The vision system sees. The LLM reasons. But right now all of this lives on my workbench, connected to the Omnibot with a tangle of wires. The next challenge is making this portable and self-contained. I need to get the Raspberry Pi, camera, display, and power system physically mounted on or inside the robot in a way that looks good and actually works at a busy maker faire.
This is going to take some serious design work, and I have until April to figure it out.
The Mounting Challenge
The Omnibot wasn't designed to carry a Raspberry Pi. Its internal cavity is mostly taken up by the original electronics, the cassette mechanism, and the battery compartment. I could gut it and replace everything with modern hardware, but that feels wrong. Part of the charm of this project is that the original 1984 electronics still work. The robot moves using its original motor drivers. The cassette player still accepts tapes. I want to add the AI system without destroying what makes this robot special.
That means the Pi and camera probably need to live externally. I'm thinking about designing some kind of "AI buddy" enclosure that attaches to the robot. Maybe it sits on the serving tray, or mounts to the back, or rides along as a companion unit. Whatever the solution, it needs to hold the Pi 5, the AI camera (positioned to see forward), the eye display, and a power source. And it needs to look like it belongs with a 1980s robot, not like I duct-taped a computer to a toy.
Collaborating with PLACITECH
For the 3D modeling and enclosure design, I'm teaming up with PLACITECH, a local Miami maker and creative studio. Usually I'd work with Tom and Daisy over at Moonlighter FabLab for projects like this, but I wanted to branch out and collaborate with other local creators and makers in the community. The aesthetic challenge here is unique: I need something that bridges four decades of design language.
The vision is an AI buddy that looks like it came from 2030 but was somehow best friends with a robot from 1984. Sleek enough to feel futuristic, but with design cues that complement the Omnibot's chunky buttons and rounded plastic shell. PLACITECH will be helping with everything from the initial concept sketches to the functional design, figuring out how to integrate the camera, display, and power system into something that actually looks intentional rather than improvised.
Working with other makers is one of the best parts of projects like this. Everyone brings different skills and perspectives. I know the electronics and the software. PLACITECH knows form and fabrication. Together we can build something neither of us would have made alone.
Power Problems
Power is always the hardest part of mobile robotics projects. The Raspberry Pi 5 is hungry. It wants 5V at up to 5A, especially when the AI camera is running inference and the display is active. The Omnibot itself runs on D batteries (six of them), which is a completely different voltage. I can't just tap into the robot's power system without some serious voltage regulation.
My current thinking is a dedicated USB power bank for the Pi. A good 20,000mAh bank with USB-C Power Delivery should run the system for several hours. The challenge is finding one that fits the enclosure design and doesn't look out of place. I might end up 3D printing a custom battery compartment that matches the Omnibot's aesthetic. Or I could go with a proper LiPo battery pack and a buck converter, which would be more elegant but adds complexity and safety considerations.
There's also the question of charging. At Maker Faire, I'll be demoing this robot for hours. I need a way to swap or charge batteries without disassembling everything. Quick-release connectors, maybe. Or a charging dock the robot can return to. Still working through the options.
Aesthetics Matter
This might sound superficial, but aesthetics are actually critical for this project. The whole point is the contrast between 1984 hardware and 2026 AI. If the modern tech looks modern, that contrast is lost. The Raspberry Pi needs to be hidden or disguised. The camera needs to look like it belongs. The eye display should feel like a feature the original designers might have included if the technology existed.
I'm looking at 3D printing enclosures in colors that match the Omnibot's cream and gray plastic. Maybe adding some fake vents or panel lines that echo the robot's original styling. The eye display already helps with this since it gives the robot an expressive face that fits the friendly butler aesthetic. But the camera is tricky. It's clearly a modern component. I might need to create some kind of housing that makes it look like a sensor from the 80s.
Calibration and Testing
Once the hardware is mounted, the real work begins: making the robot actually navigate reliably. Right now, the movement system is open-loop. I send a tone for a certain duration, and the robot moves that direction. But there's no feedback. I don't actually know how far it moved or whether it turned exactly 90 degrees. Carpet vs. hardwood changes everything. Battery level affects motor speed. Temperature affects the motors. Two identical commands can produce different results.
This means extensive calibration testing. I need to figure out exactly how long to play each tone for different movement increments. A "step forward" needs to be consistent. A "turn left" needs to actually be 90 degrees, or the robot will drift off course over time. I'll probably end up with lookup tables for different surfaces and conditions, and maybe some adaptive logic that adjusts based on what the camera sees.
The turn calibration is especially important. If the robot thinks it turned 90 degrees but actually turned 85, that error compounds. After four turns it should be back where it started, but instead it's facing a completely different direction. I need to test this obsessively until it's reliable.
Getting Lost and Recovery
Robots get lost. It's going to happen, especially at a crowded maker faire where kids might pick it up and move it, or it might drive into a corner, or someone might block its camera. The system needs graceful recovery strategies.
Some ideas I'm working through:
- Search patterns: If the robot doesn't see anything relevant for a while, it should start a systematic search. Turn in place, scan the room, look for recognizable objects or people.
- Stuck detection: If the camera view doesn't change after a movement command, the robot might be stuck against an obstacle. Back up and try a different direction.
- Return to home: Define a "home base" with a distinctive visual marker. If the robot gets confused, it can search for the marker and return to a known position.
- Manual override: Big obvious buttons that let a human take control. Sometimes the best recovery is just having someone drive it back to center stage.
- Timeout behaviors: If nothing interesting happens for 30 seconds, do something engaging. Dance, say something funny, look around. This keeps the robot entertaining even when it's confused.
The LLM actually helps here. I can include recovery instructions in the system prompt. "If you haven't seen anything interesting in 5 iterations, try searching in a new direction." The model can reason about being lost and decide what to do, rather than needing hard-coded state machines.
The April Deadline
Maker Faire Miami is in April. That gives me roughly two months to solve mounting, power, aesthetics, calibration, and recovery. It's ambitious, but that's how maker projects work. You set a deadline, you commit to showing up, and then you figure it out. The deadline forces decisions. Good enough beats perfect when you're staring down a demo date.
I'll be documenting the physical integration process in Part 4 of this series. Expect 3D printing, probably some failures, definitely some late nights, and hopefully a robot that can autonomously wander around a maker faire delighting kids and adults alike.
Beyond the physical build, Part 4 will also explore expanding the AI capabilities: better object tracking, voice command input so you can talk to the robot directly, memory so it remembers people it's met, and possibly swapping in newer models as they become available. The software side of this project is never really "done" — every new model release opens up possibilities that weren't practical before. Stay tuned.
The Journey So Far
This project started with a corroded robot from 1984 and has evolved into something I never expected:
- Part 1: Teardown, battery acid cleanup, first drive test
- Part 2: Bluetooth control, web controller, synthesized speech
- Part 3: AI vision, cloud LLM reasoning, autonomous behavior
- Part 4: Physical integration, Ring-O, debugging the AI, Maker Faire prep
- Part 5: The WiFi problem, a fifteen-second freeze at the Faire, and the fix
The future of robotics isn't always about building new hardware. Sometimes it's about breathing new life into the classics. The Omnibot was a promise of a robotic future. Now, 40 years later, that promise is finally being fulfilled.
See you at Maker Faire Miami!